
I truly don’t know how five weeks disappeared that fast! March was a whirlwind… I headed to Stampin’ Up! OnStage with a few hundred of my closest crafty friends, then rolled straight into my son’s spring break, followed by Easter… and now somehow it’s almost May?! Time is clearly on fast-forward!
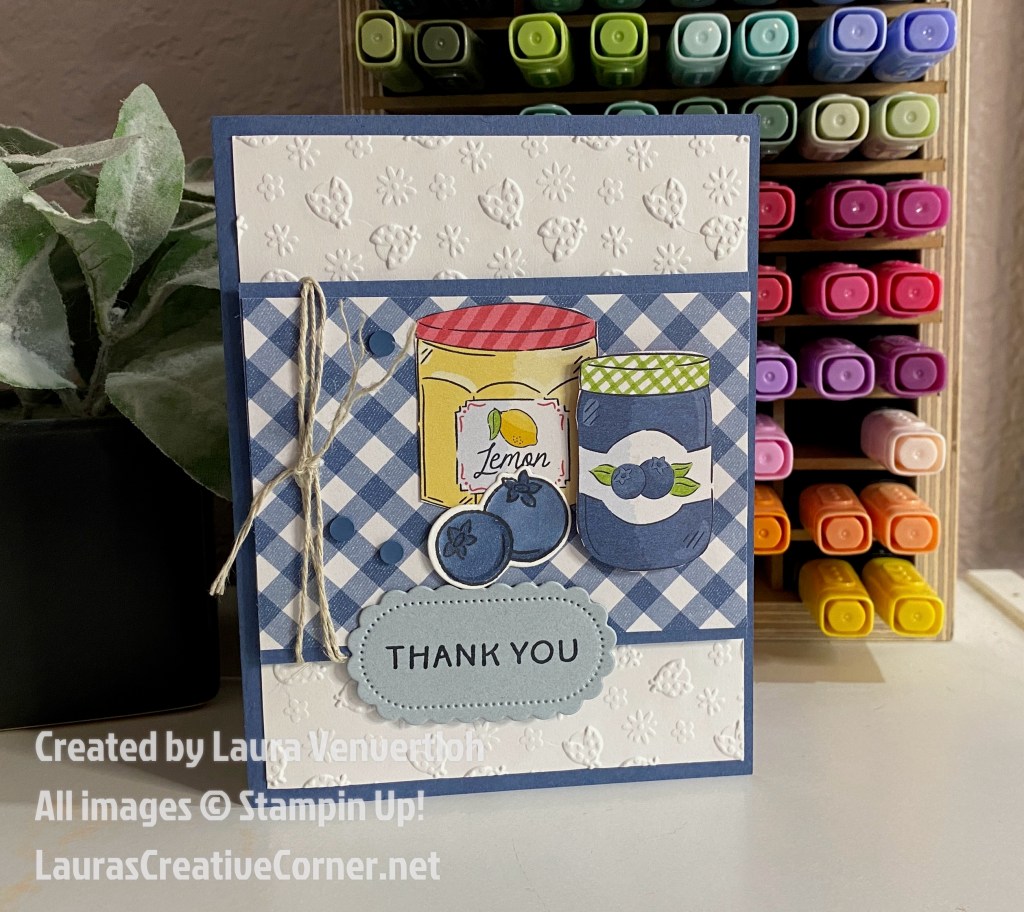
Today I have a special treat for you! I created this card for my Simply Suite Stampers group and couldn’t wait to share it here, too. The Homemade Sweetness Suite is just too cute for words. It has the sweetest whimsical, summertime charm in both the images and the designer paper. And one of my favorite details? You can fussy cut those adorable jam jars right from the DSP… instant charm in a snip!
Another fun bonus is the Made with Sweetness Bundle and coordinating workshop kit. The dies include the cutest recipe-shaped label along with berries, which opens the door to so many creative ideas like recipe cards or even a mini album. It’s one of those suites that keeps the inspiration flowing long after your first project.
Alright… let’s get to the card!

Cutting Measurements
- Secret Sea Cardstock
- 5 ½” x 8 ½” (card base)
- 3″ x 4″
- Basic White
- Two pieces: 5 ¼” x 4″ (inside + embossed layer)
- Scrap for stamping
- Cloud Cover
- 2 ½” x 2″ (sentiment)
- Homemade Sweetness DSP
- 2 ¾” x 3 ¾”
- Additional pieces for fussy cutting
Instructions
- Fold the Secret Sea cardstock in half to create your card base. Burnish with a Bone Folder for a crisp fold.
- Adhere one Basic White (5 ¼” x 4″) piece to the inside of the card.
- Stamp your sentiment on the Cloud Cover piece using Secret Sea Ink. Die cut using the Filled with Sweetness Dies.
- Take the second Basic White (5 ¼” x 4″) piece and emboss it using the Ladybug Picnic 3D Embossing Folder.
Adhere this to the front of the card base. - Adhere the DSP (2 ¾” x 3 ¾”) to the 3″ x 4″ Secret Sea layer.
- Wrap Linen Thread around this layered piece and tie into a bow.
- Attach this panel to the card front using Dimensionals.
- Cut out two jam jars from the DSP.
- Stamp a blueberry image onto Basic White using Memento Black Ink.
Die cut and color using Secret Sea Stampin’ Blends. - Adhere:
- One jar flat onto the center panel
- The second jar with Dimensionals for depth
- Add the blueberries and brush with Wink of Stella for sparkle ✨
- Attach the sentiment label to the bottom left using Dimensionals.
- Finish with Strawberries & Dots embellishments.
Supplies
- Secret Sea Ink Pad & Stampin’ Blends
- Memento Black Ink
- Ladybug Picnic 3D Embossing Folder
- Linen Thread
- Strawberries & Dots Embellishments
- Dimensionals
Want to get your hands on the full tutorial? I’ve got you covered!
There are two easy ways to grab it:
🛍️ Option 1: Head to my online store and place an order of $35 or more (subtotal after any rewards). I’ll send the full tutorial straight to your inbox! https://www.stampinup.com/?demoid=2024956
🔗 Option 2: Prefer to grab it directly? You can purchase the tutorial here: https://lp.constantcontactpages.com/ev/reg/37f6v2w/lp/9821de5b-4907-4de5-9ce1-cbc634a76dba

