
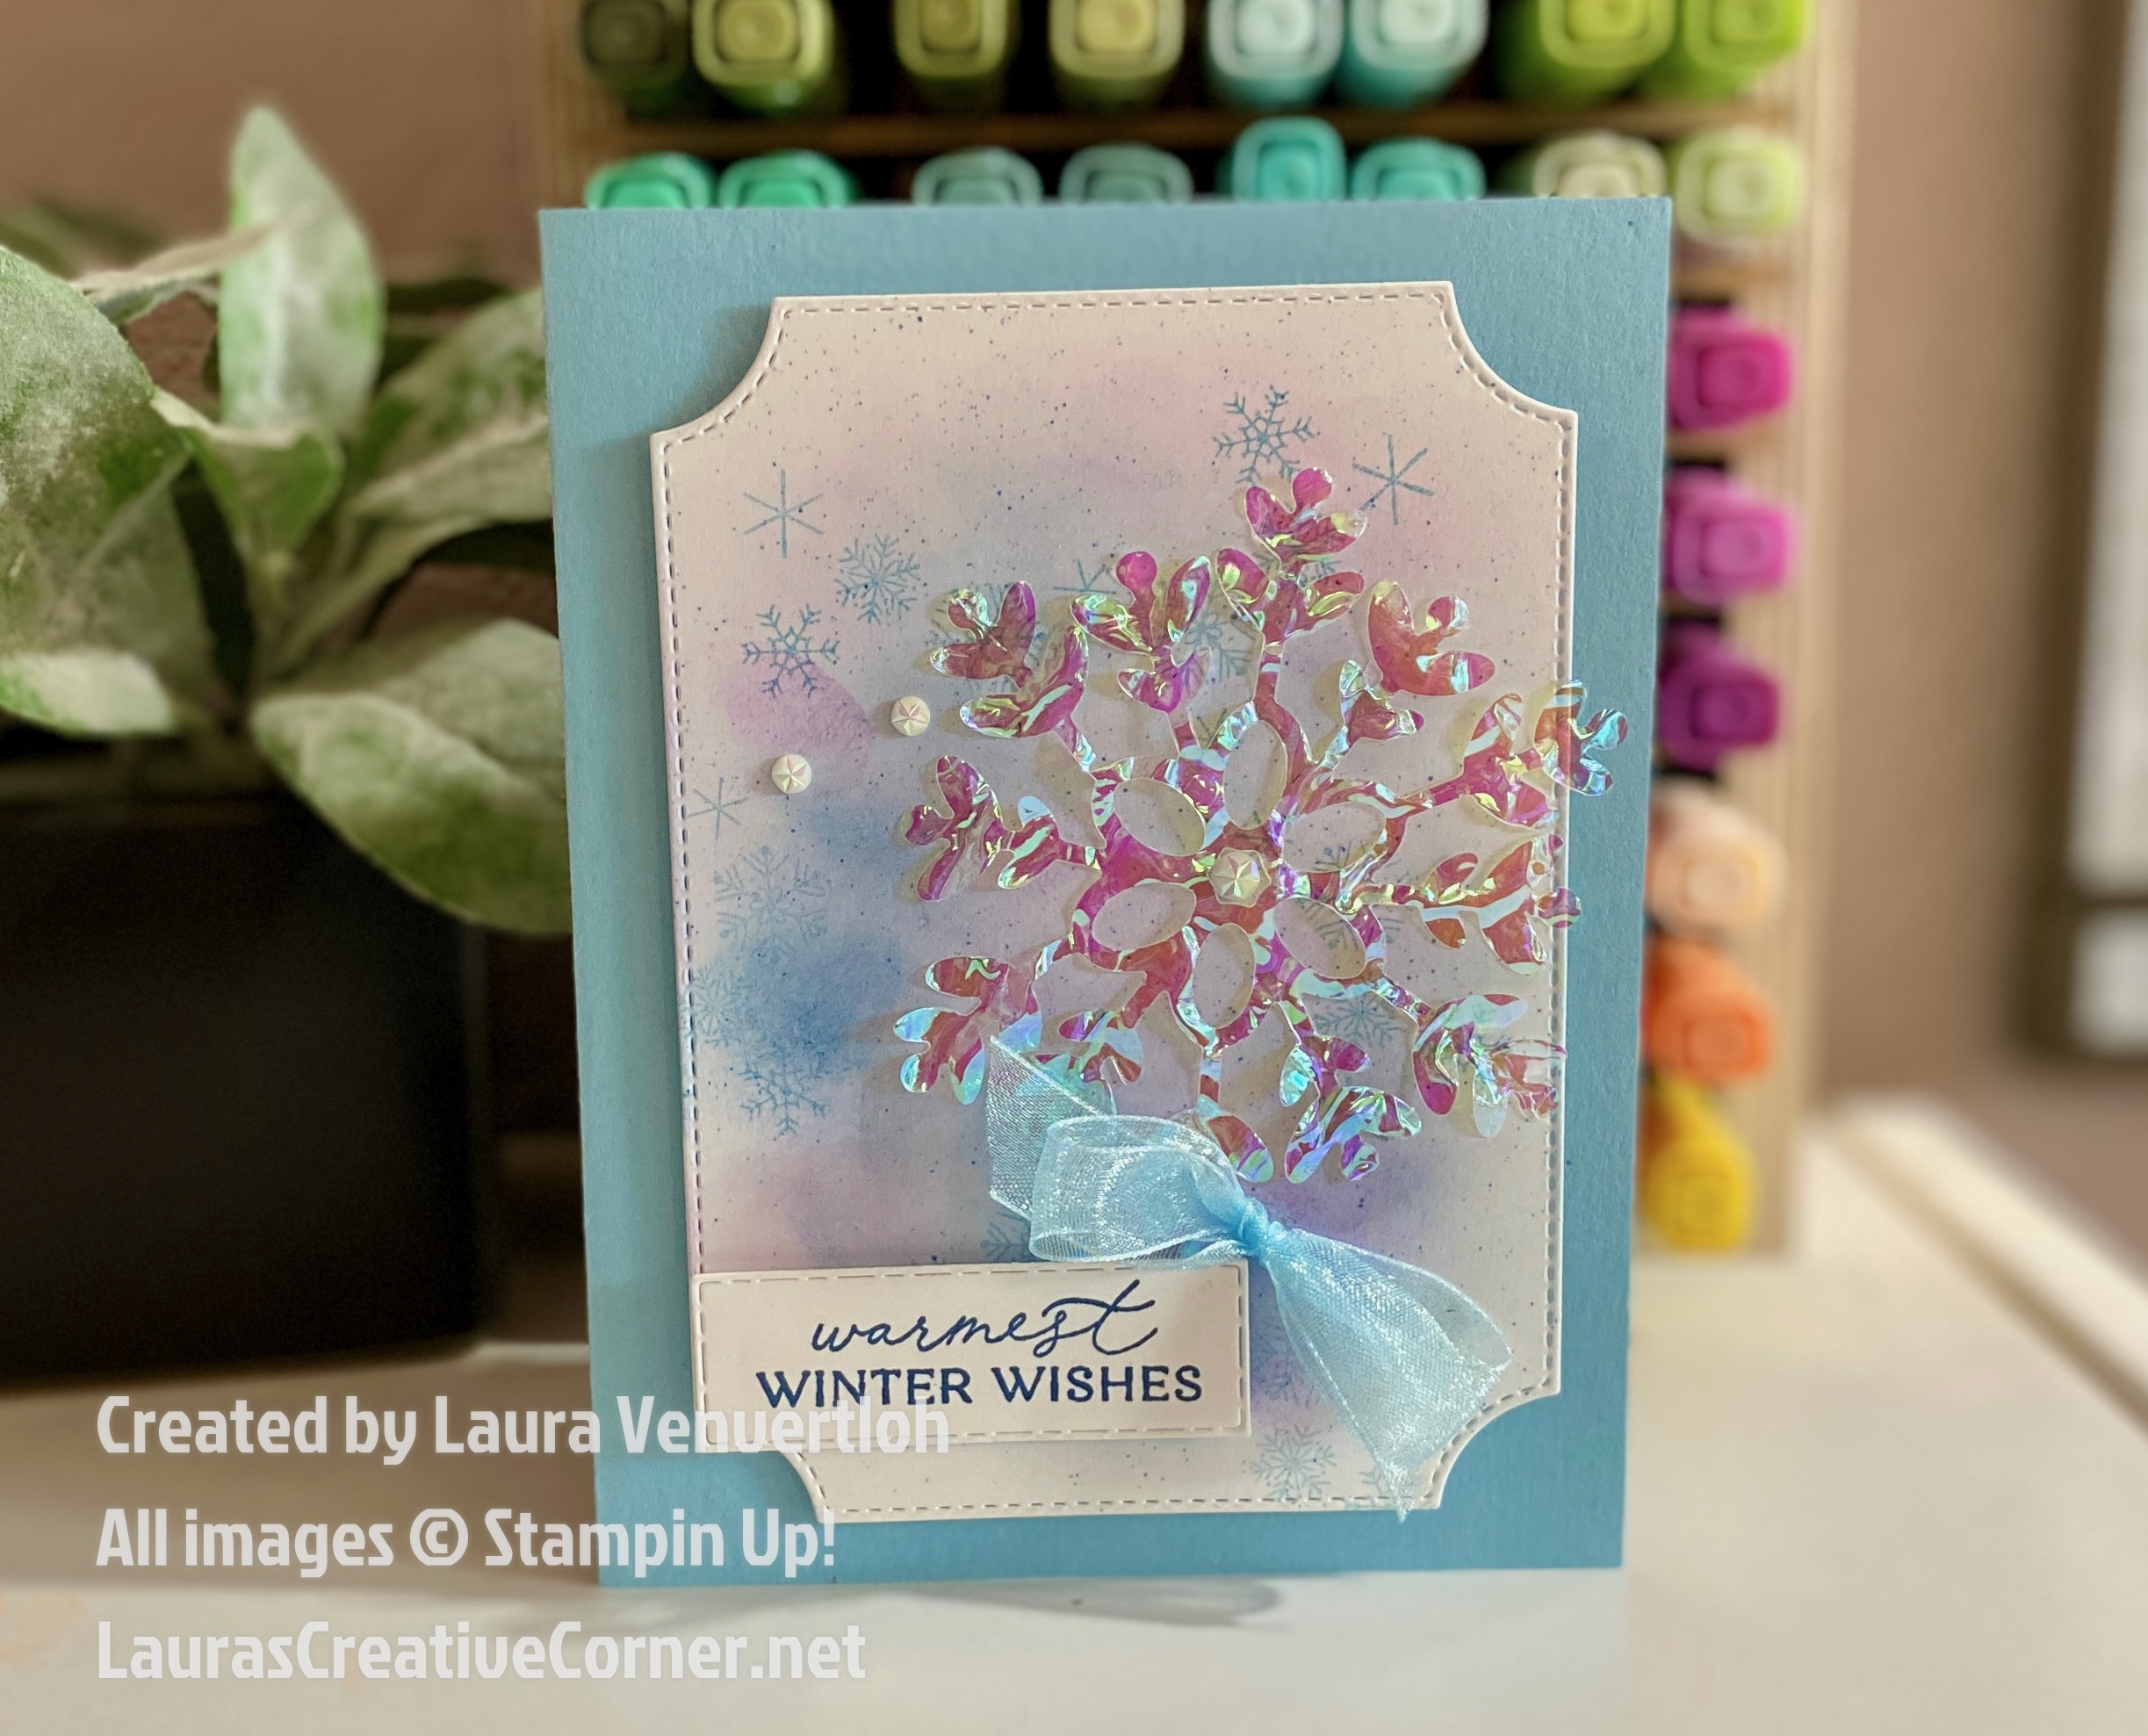
Looking for a new way to add shimmer and texture to your winter cards? Today I’m sharing a fun technique using Iridescent Treat Bags to create unique, dimensional die cuts! With just a little heat and your Stampin’ Cut & Emboss Machine, you can transform these bags into sturdy, shrink-style embellishments full of sparkle.
This project features a cool, breezy snow theme with soft winter colors and the Snowy Delight Bundle, Branching Out Dies, and of course—lots of shimmer! Let’s get started.
❄️ Project Supplies
- Iridescent Treat Bags
- Heat Tool
- Stampin’ Cut & Emboss Machine
- Snowy Delight Bundle
- Branching Out Dies
- Balmy Blue Cardstock (8-1/2″ x 5-1/2″)
- Basic White Cardstock
- Blending Brushes
- Balmy Blue, Fresh Freesia & Misty Moonlight Ink Pads
- Glue Dots or Tombow Mono Liquid Glue
- Iridescent Faceted Gems
- Balmy Blue 3/8″ Sheer Ribbon
✨ Step-by-Step Tutorial
1. Heat the Iridescent Treat Bag
Start by gently heating your Iridescent Treat Bag using a Heat Tool.
You’ll notice it begins to shrink slightly and thicken—this is exactly what you want!
Heating makes the material sturdier and perfect for die-cutting.
Tip: Hold the bag with a crafting tweezer so your fingers stay safe!

2. Die-Cut the Snowflake
Once cooled, place the treated bag onto your cutting plates and run it through your Stampin’ Cut & Emboss Machine.
Because of the slightly thicker texture, run the die 3–4 times to ensure a clean cut.
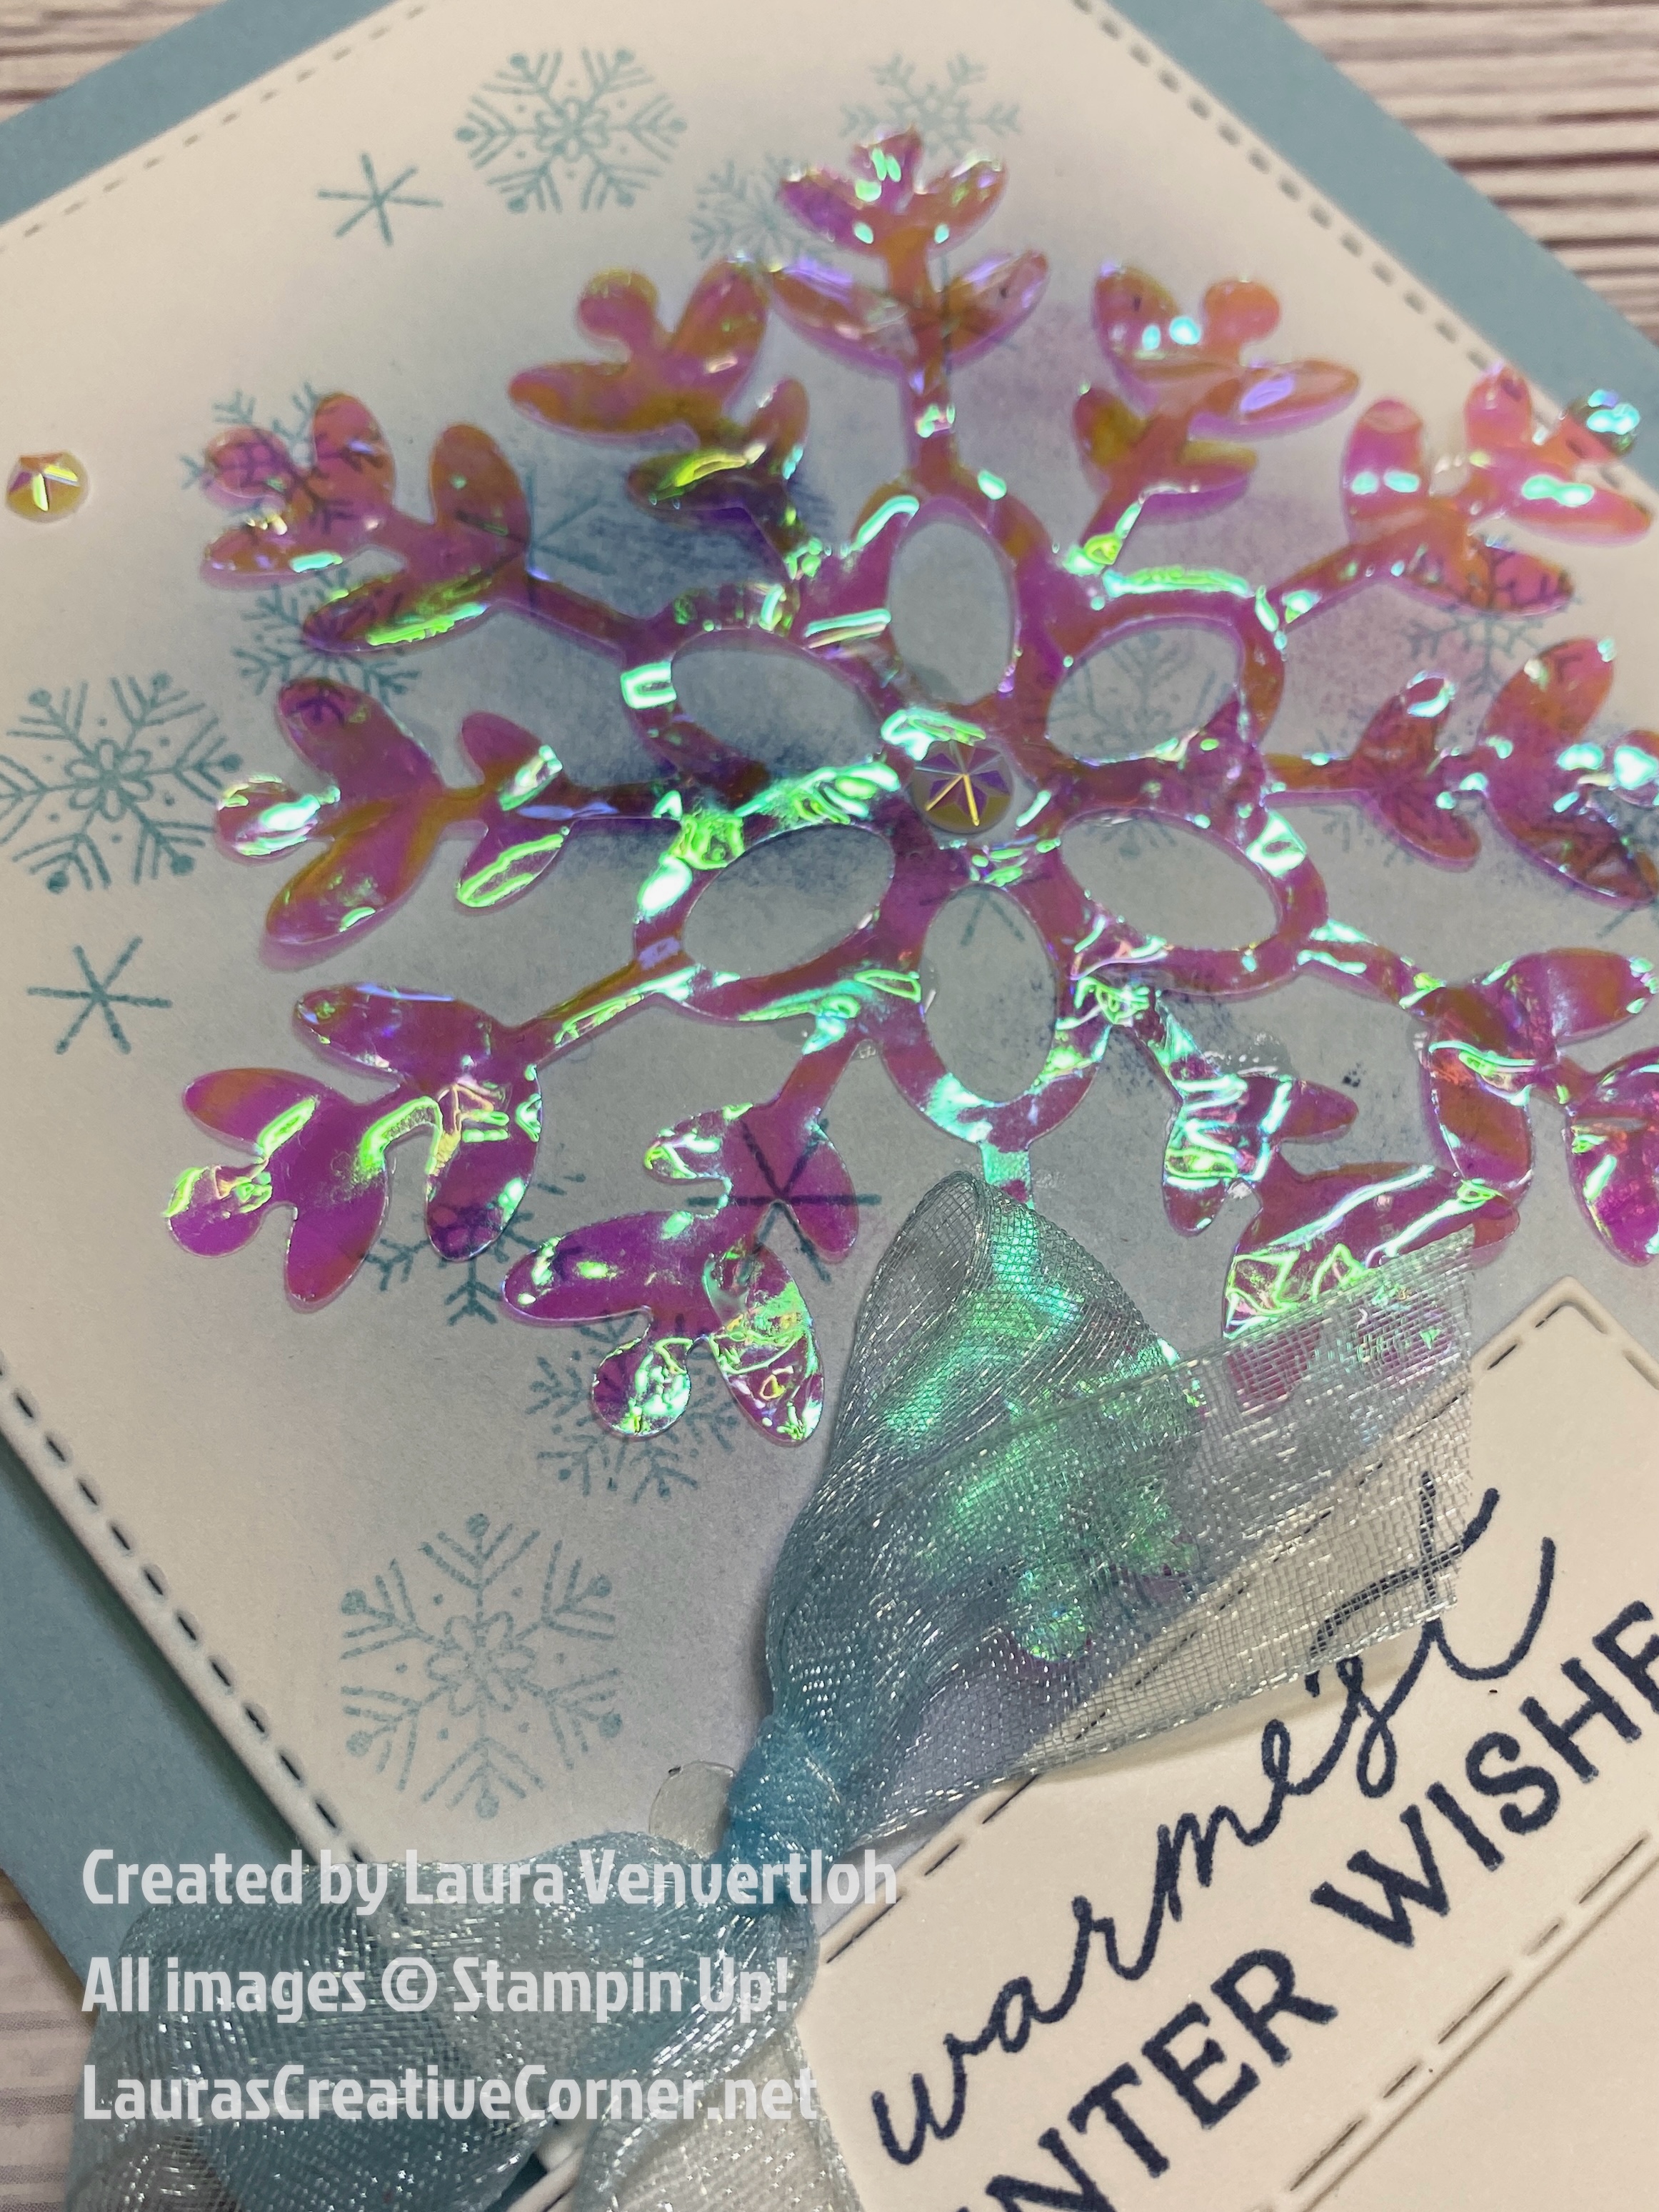
I used a snowflake from the Snowy Delight Bundle—the iridescent finish makes it look frosty and magical!
3. Create the Soft Snow Breeze Background
Using the Branching Out Dies, cut a Basic White layer to add texture and a wintery tree-branch backdrop.
Then lightly blend:
- Balmy Blue
- Fresh Freesia
- Misty Moonlight
Use soft, circular motions with your Blending Brushes to create a gentle swirl of snowy color across the panel.
It gives the perfect backdrop for the stamped elements!
Stamp the snowflake cluster from the Snowy Delight Bundle onto the blended area for added depth.
4. Assemble the Card
- Fold your Balmy Blue Card Base (8-1/2″ x 5-1/2″, scored at 4-1/4″)
- Add the blended Basic White panel
- Attach your Iridescent Treat Bag snowflake using Glue Dots or Tombow Mono Liquid Glue
- Tie on a bit of Balmy Blue Sheer Ribbon for softness
- Finish with a sprinkle of Iridescent Faceted Gems ✨
The Finished Look
The iridescent die-cut snowflake catches the light beautifully, giving your winter cards a frosty, high-end look. And the best part? It’s an inexpensive technique you can create with items you already have in your craft stash!
Give this trick a try with other shapes—stars, ornaments, or even florals. You’ll love how unique and sturdy the finished pieces turn out!
Here is the replay of the YouTube video as well!

![Snowy Delights Bundle (English) [ 165809 ]](https://assets1.tamsnetwork.com/images/EC042017NF/165809s.jpg "Snowy Delights Bundle (English) [ 165809 ]")
![Branching Out Dies [ 165775 ]](https://assets1.tamsnetwork.com/images/EC042017NF/165775s.jpg "Branching Out Dies [ 165775 ]")
![Iridescent Treat Bags [ 166204 ]](https://assets1.tamsnetwork.com/images/EC042017NF/166204s.jpg "Iridescent Treat Bags [ 166204 ]")
![Small Blending Brushes [ 160518 ]](https://assets1.tamsnetwork.com/images/EC042017NF/165767s.jpg "Small Blending Brushes [ 160518 ]")
![Iridescent Faceted Gems [ 163368 ]](https://assets1.tamsnetwork.com/images/EC042017NF/163368s.jpg "Iridescent Faceted Gems [ 163368 ]")
![Balmy Blue Classic Stampin' Pad [ 147105 ]](https://assets1.tamsnetwork.com/images/EC042017NF/147105s.jpg "Balmy Blue Classic Stampin' Pad [ 147105 ]")
![Misty Moonlight Classic Stampin' Pad [ 153118 ]](https://assets1.tamsnetwork.com/images/EC042017NF/153118s.jpg "Misty Moonlight Classic Stampin' Pad [ 153118 ]")
![Fresh Freesia Classic Stampin' Pad [ 155611 ]](https://assets1.tamsnetwork.com/images/EC042017NF/155611s.jpg "Fresh Freesia Classic Stampin' Pad [ 155611 ]")
![Balmy Blue 8-1/2" X 11" Cardstock [ 146982 ]](https://assets1.tamsnetwork.com/images/EC042017NF/146982s.jpg "Balmy Blue 8-1/2\" X 11\" Cardstock [ 146982 ]")
![Basic White 8 1/2" X 11" Cardstock [ 166780 ]](https://assets1.tamsnetwork.com/images/EC042017NF/166780s.jpg "Basic White 8 1/2\" X 11\" Cardstock [ 166780 ]")
![Heat Tool (Us And Canada) [ 129053 ]](https://assets1.tamsnetwork.com/images/EC042017NF/129053s.jpg "Heat Tool (Us And Canada) [ 129053 ]")
![Multipurpose Liquid Glue [ 110755 ]](https://assets1.tamsnetwork.com/images/EC042017NF/110755s.jpg "Multipurpose Liquid Glue [ 110755 ]")
![Mini Glue Dots [ 103683 ]](https://assets1.tamsnetwork.com/images/EC042017NF/103683s.jpg "Mini Glue Dots [ 103683 ]")
